Dear friend, today we will see how to configure rsyslog server and client in Linux, so let’s start and see step by step this process.
We will cover these topics in this learning session:-
- Introduction about is rsyslog server
- Why we use it?
- Architecture of rsyslog server and client.
- Configure rsyslog Server
- Configure rsyslog Client(s)
- Example: A Real‑World Mini Setup
- Digging Deeper: Practical Tips & Examples
- Troubleshooting Common Issues
- Recap & Best Practices
1. Introduction about is rsyslog server
Rsyslog is a powerful and flexible logging system that can handle both traditional syslog tasks and new log processing methods. It offers adaptable routing, sophisticated filtering, structured logging, and works well with modern monitoring tools like Elasticsearch, Kafka, and cloud services.
2. Why we use it?
rsyslog is a widely used, open‑source syslog daemon. It’s available on many Linux distributions and offers powerful features:
- Flexible configuration—you can route logs to files, databases, remote servers, or even process them with scripts.
- High performance—handles large volumes of log messages efficiently.
- Secure transport options—supports encrypted syslog over TLS.
- Advanced filtering—you can route or discard messages based on content, severity, facility, origin, and more.
- Compatibility—supports both legacy (RFC 3164) and newer (RFC 5424) syslog formats, plus a variety of input sources.
In the blog below, I’ll walk you through setting up rsyslog as both a server and a client, with clear examples you can adapt.
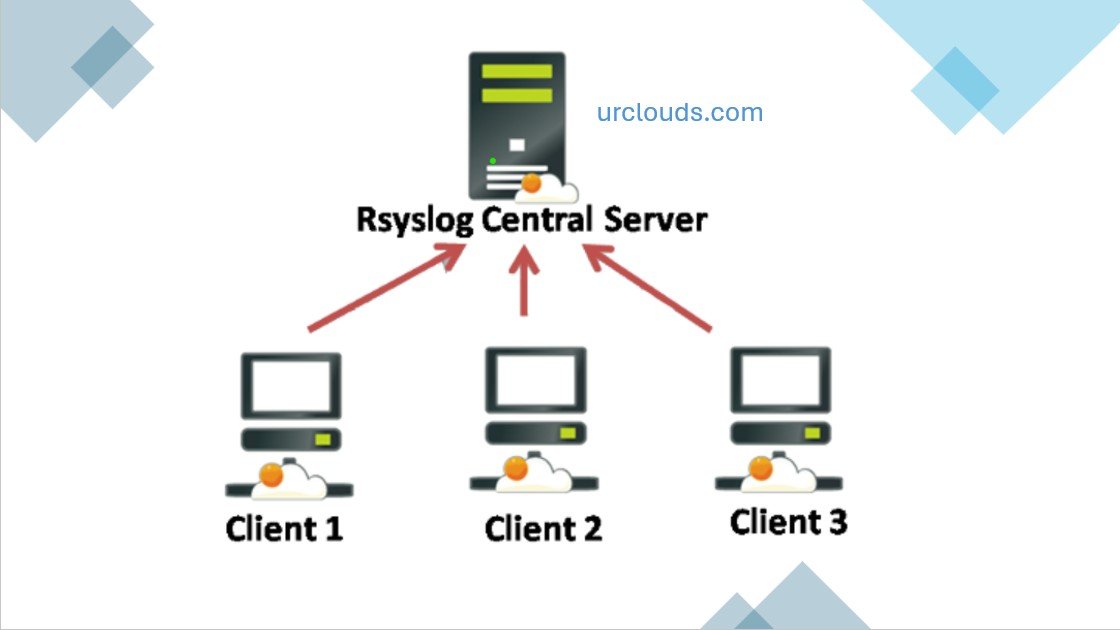
3. Architecture of rsyslog server and client.
Imagine you have multiple Linux servers—maybe a web server, a database server, and an application server. You want all their logs to go to one place so you can monitor performance, troubleshoot issues, or get alerts when something’s wrong.
- rsyslog client: Sends logs from each server to the central log collector.
- rsyslog server: Receives incoming logs, processes them, and stores them in organized files or forwards them elsewhere.
Let’s first set up the server side.
4. Configure rsyslog Server
4.1 Install rsyslog
Most modern Linux distros come with rsyslog installed by default. If not, you can install it:
- Debian/Ubuntu:
sudo apt update
sudo apt install rsyslog
- CentOS/RHEL or Fedora:
sudo yum install rsyslog     # older versions
sudo dnf install rsyslog     # newer versions
After installation, the service should be enabled and running:
sudo systemctl enable rsyslog
sudo systemctl start rsyslog
sudo systemctl status rsyslog
4.2 Configure rsyslog server to Receive Remote Logs
Open the main configuration file (often /etc/rsyslog.conf or files under /etc/rsyslog.d/).
Locate—or add—the following lines to listen for incoming syslog messages:
# Enable UDP syslog reception (Port 514)
module(load="imudp")
input(type="imudp" port="514")

# Enable TCP syslog reception (Port 514)
module(load="imtcp")
input(type="imtcp" port="514")
These lines load modules to listen for syslog via both UDP and TCP on port 514.
4.3 Organize Incoming Logs by Client
To store logs in separate files per client, add:
$template RemoteLogs,"/var/log/remote/%HOSTNAME%/%PROGRAMNAME%.log"
*.* ?RemoteLogs
& stop
Explanation:
templatedefines a log‑file path using%HOSTNAME%and%PROGRAMNAME%placeholders.*.* ?RemoteLogsmeans “for all messages (any facility, any severity), use that template.”& stopensures no further processing of those messages.
Now, logs will appear under /var/log/remote/client‑hostname/app.log, for example.
4.4 Restart rsyslog
Apply changes:
sudo systemctl restart rsyslog
4.5 (Optional) Enable TLS for Secure Logging
If you want secure transmission, use TLS:
- Generate a certificate and key (or use corporate CA).
- Place them in, say,
/etc/rsyslog.d/ca.pem,/etc/rsyslog.d/server-cert.pem,/etc/rsyslog.d/server-key.pem.
In config:
module(load="imtcp")
module(load="gtls")

global(
  DefaultNetstreamDriver="gtls"
  DefaultNetstreamDriverCAFile="/etc/rsyslog.d/ca.pem"
  DefaultNetstreamDriverCertFile="/etc/rsyslog.d/server-cert.pem"
  DefaultNetstreamDriverKeyFile="/etc/rsyslog.d/server-key.pem"
)

input(type="imtcp" port="6514" streamdriver="gtls" streamdriver.mode="1" streamdriver.authmode="x509/name")

$template SecureRemoteLogs,"/var/log/secure-remote/%fromhost-ip%/%programname%.log"
*.* ?SecureRemoteLogs
& stop
Then restart again.
5. Configure rsyslog Client(s)
Now, configure each client machine to send its logs to the central server.
5.1 Install rsyslog (if not already present)
Use the same package commands as earlier.
5.2 Configure Remote Logging
Open /etc/rsyslog.conf or a new file under /etc/rsyslog.d/.
Add:
# Send all facility logs to the remote server via UDP
*.* @logserver.example.com:514

# Or, via TCP
*.* @@logserver.example.com:514
- Use single
@for UDP, double@@for TCP. - Replace
logserver.example.comwith your server’s hostname or IP.
To narrow scope, you could filter to only certain logs—for example, only system logs:
auth,authpriv,daemon.* @logserver.example.com:514
5.3 Optional: TLS‑Secured Transmission
If your server is running TLS, configure:
module(load="imuxsock")  # for local log sockets
module(load="omrelp")    # or omfwd with GTLS

# Forwarding using RELP (reliable syslog protocol)
*.* :omrelp:logserver.example.com:2514

# Or using TLS via omfwd
module(load="ommgtls")

action(
  type="omfwd"
  target="logserver.example.com"
  port="6514"
  protocol="tcp"
  StreamDriver="gtls"
  StreamDriverMode="1"
  StreamDriverAuthMode="x509/name"
  StreamDriverPermittedPeers="logserver.example.com"
  action.resumeRetryCount="infinite"
)
This ensures your client sends logs over a secure, encrypted channel.
5.4 Restart rsyslog on Client
sudo systemctl restart rsyslog
5.5 Testing
On the client, send a test message:
logger "Hello, this log goes to the remote server"
Check on the server:
ls /var/log/remote/
# Or for secure setup:
/var/log/secure-remote/
You should see a log file for the client’s hostname and inside it your test message.
6. Example: A Real‑World Mini Setup
Let’s illustrate with two machines:
- Server:
logserver(IP:192.168.1.100) - Client:
web01(IP:192.168.1.101)
On logserver:
/etc/rsyslog.d/remote.conf:
module(load="imudp")
input(type="imudp" port="514")

module(load="imtcp")
input(type="imtcp" port="514")

$template RemoteLogs,"/var/log/remote/%HOSTNAME%/%PROGRAMNAME%.log"
*.* ?RemoteLogs
& stop
Restart:
sudo systemctl restart rsyslog
Ensure firewall allows port 514 UDP/TCP.
On web01:
/etc/rsyslog.d/forward.conf:
*.* @@192.168.1.100:514
Restart:
sudo systemctl restart rsyslog
Test:
logger "Test log from web01 to rsyslog server"
On logserver:
ls /var/log/remote/
/var/log/remote/web01/
ls /var/log/remote/web01/
You should see files like logger.log containing the test message.
7. Digging Deeper: Practical Tips & Examples
7.1 Selective Logging
You don’t always want everything. Logic like this can help:
# Log cron, auth, and kern messages
cron.*        /var/log/cron.log
auth,authpriv.* /var/log/auth.log
kern.*        /var/log/kern.log
You could adapt similar filters for remote forwarding:
daemon.* @logserver.example.com:514
7.2 Rate Limiting
To avoid log storms:
module(load="imuxsock" SysSock.Use="off")  # disable default socket (optional)
module(load="imtcp" MaxSessions="100")
Or use rate limiting:
$SystemLogRateLimitInterval 5
$SystemLogRateLimitBurst 200
This limits logs to 200 messages per 5 seconds (and drops the rest).
7.3 Log Rotation
Make sure remote logs don’t grow uncontrollably—use logrotate.
Example /etc/logrotate.d/remote:
/var/log/remote/*/*.log {
  daily
  rotate 7
  compress
  missingok
  notifempty
  create 0640 syslog adm
  sharedscripts
  postrotate
    systemctl reload rsyslog > /dev/null 2>/dev/null || true
  endscript
}
This rotates logs daily, keeps a week’s worth, compresses them, and ensures proper ownership.
7.4 Central Analysis
Once your logs are centralized, you can feed them into SIEM or analytics tools like:
- ELK Stack (Elasticsearch, Logstash, Kibana)
- Graylog
- Splunk
ELK example: In Elasticsearch, each client‑hostname can become an index name. Kibana lets you search across all or filter by host.
7.5 Troubleshooting Common Issues
No logs arriving?
- Ensure UDP/TCP port (514 or 6514) is open in firewall on the server.
- Check that
imudporimtcpis enabled and correctly configured. - On clients, confirm the hostname resolves to the server and SELinux/AppArmor isn’t blocking.
Format issues?
- Set the same syslog format (BSD vs. RFC 5424) across server and clients—or let rsyslog interpret automatically.
File permissions?
The server must have the right directory ownership (e.g., /var/log/remote/hostname owned by syslog:adm), and logrotate must honor that.
8. Recap & Best Practices
- Use UDP if simplicity is highest priority, but be aware it’s connectionless—packets can drop.
- Use TCP for reliability, especially across networks.
- Use TLS for secure log transmission, particularly for sensitive environments.
- Organize logs by client and application for better manageability.
- Implement log rotation to manage disk space.
- Ensure firewall rules and permissions align with your forwarding setup.
- Apply filtering and rate limits to reduce noise and prevent overload.
- Forward logs to analytics platforms for deeper visibility and alerts.
Conclusion
A syslog server—particularly an rsyslog‑based setup—is a game‑changer for centralizing and managing logs across your infrastructure. Whether you’re monitoring dozens of servers or just a few, it helps you:
- Save time troubleshooting issues.
- Gain visibility without hopping between machines.
- Securely capture valuable log data.
- Clean up and automate log collection so you can focus on insights—not manual log gathering.
By walking through the installation and configuration of both server and client, showing how to filter and organize logs, and giving real‑world mini setups, you’re now equipped to build your own rsyslog logging infrastructure.
You can also check this below link if you want to configure DNS and NTP in Linux server