Dear Friends in this tutorial we will see how to set MTU size in Linux and we will also know what is MTU and why it MTU size is must for Linux? So, let’s start and see steps by steps this process.
We will cover these topics in session:-
- What is MTU in Linux?
- Why MTU size is must in Linux?
- How to set MTU size in Linux with ficonfig command?
- How to verify MTU size with ifconfig command?
- How to set MTU with IP command?
- How to verify MTU with IP command?
- How to verify the MTU packet size with ping command?
1. What is MTU in Linux?
MTU stand for (Maximum Transmission Unit) it’s a size of largest protocol data unit that can communicated in single network layer transaction. MTU depends on underlying network capabilities and must be adjusted manually or automatically to not exceed these capabilities.
For more details about MTU you can Click Here
2. Why MTU size is must in Linux?
Large packets occupy a slow link for more time than a smaller packet, causing greater delays to subsequent packets, and increasing network delay and delay variation. For example, a 1500-byte packet, the largest allowed by Ethernet at the network layer, ties up a 14.4k modem for about one second.
3. How to set MTU size in Linux with ifconfig command?
We can set MTU using ifconfig command or ip command. If we don’t have ifconfig command and our Linux is base Operating System, then we can us ip command. Like below: –
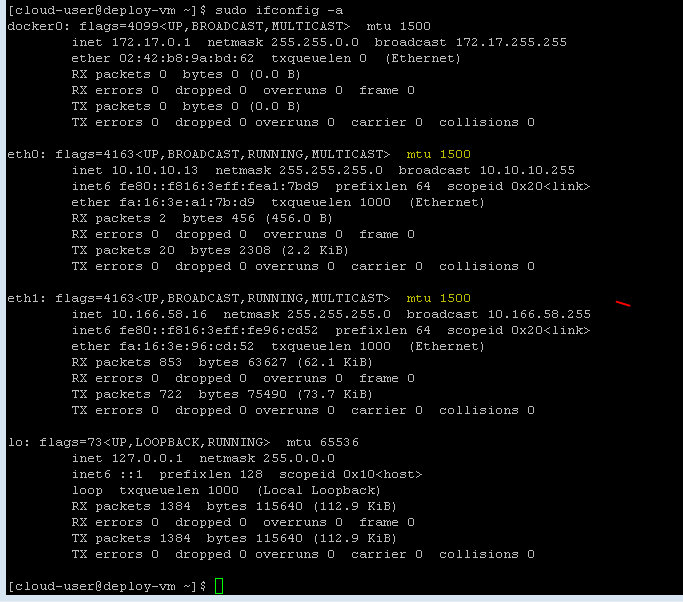
First of all we will check current MTU size with ifconfig commands.
[cloud-user@deploy-vm ~]$ sudo ifconfig -a
 docker0: flags=4099  mtu 1500
         inet 172.17.0.1  netmask 255.255.0.0  broadcast 172.17.255.255
         ether 02:42:b8:9a:bd:62  txqueuelen 0  (Ethernet)
         RX packets 0  bytes 0 (0.0 B)
         RX errors 0  dropped 0  overruns 0  frame 0
         TX packets 0  bytes 0 (0.0 B)
         TX errors 0  dropped 0 overruns 0  carrier 0  collisions 0
 eth0: flags=4163  mtu 1600
         inet 10.10.10.13  netmask 255.255.255.0  broadcast 10.10.10.255
         inet6 fe80::f816:3eff:fea1:7bd9  prefixlen 64  scopeid 0x20

         ether fa:16:3e:a1:7b:d9  txqueuelen 1000  (Ethernet)
         RX packets 2  bytes 456 (456.0 B)
         RX errors 0  dropped 0  overruns 0  frame 0
         TX packets 20  bytes 2308 (2.2 KiB)
         TX errors 0  dropped 0 overruns 0  carrier 0  collisions 0
 eth1: flags=4163  mtu 1600
         inet 10.166.58.16  netmask 255.255.255.0  broadcast 10.166.58.255
         inet6 fe80::f816:3eff:fe96:cd52  prefixlen 64  scopeid 0x20

         ether fa:16:3e:96:cd:52  txqueuelen 1000  (Ethernet)
         RX packets 633  bytes 48331 (47.1 KiB)
         RX errors 0  dropped 0  overruns 0  frame 0
         TX packets 568  bytes 59074 (57.6 KiB)
         TX errors 0  dropped 0 overruns 0  carrier 0  collisions 0
 lo: flags=73  mtu 65536
         inet 127.0.0.1  netmask 255.0.0.0
         inet6 ::1  prefixlen 128  scopeid 0x10
         loop  txqueuelen 1000  (Local Loopback)
         RX packets 912  bytes 75951 (74.1 KiB)
         RX errors 0  dropped 0  overruns 0  frame 0
         TX packets 912  bytes 75951 (74.1 KiB)
         TX errors 0  dropped 0 overruns 0  carrier 0  collisions 0
 [cloud-user@deploy-vm ~]$
In above output you can see MTU size is 1600 on eth0 and eth1 interface.
Now we need to set 1500 MTU on eth0 and eth1. So, we can use below commands.
[cloud-user@deploy-vm ~]$ sudo ifconfig eth0 mtu 1500
[cloud-user@deploy-vm ~]$ sudo ifconfig eth1 mtu 1500
4. How to verify MTU size with ifconfig command?
Now we can verify with ifconfig command our changes is completed or not?
You can see in above output we have successfully changed MTU size of eth0 and eth1 from 1600 to 1500 MTU.
5. How to set MTU with IP command?
If don’t have ifconfig tools, then we can use ip command to change MTU size like below.
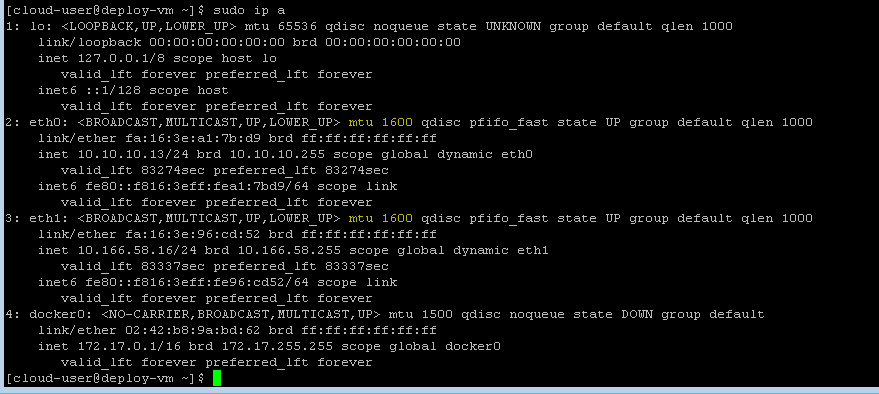
First, we can verify current MTU size with IP command.
[cloud-user@deploy-vm ~]$ ip a
 1: lo:  mtu 65536 qdisc noqueue state UNKNOWN group default qlen 1000
     link/loopback 00:00:00:00:00:00 brd 00:00:00:00:00:00
     inet 127.0.0.1/8 scope host lo
        valid_lft forever preferred_lft forever
     inet6 ::1/128 scope host
        valid_lft forever preferred_lft forever
 2: eth0:  mtu 1500 qdisc pfifo_fast state UP group default qlen 1000
     link/ether fa:16:3e:a1:7b:d9 brd ff:ff:ff:ff:ff:ff
     inet 10.10.10.13/24 brd 10.10.10.255 scope global dynamic eth0
        valid_lft 84910sec preferred_lft 84910sec
     inet6 fe80::f816:3eff:fea1:7bd9/64 scope link
        valid_lft forever preferred_lft forever
 3: eth1:  mtu 1500 qdisc pfifo_fast state UP group default qlen 1000
     link/ether fa:16:3e:96:cd:52 brd ff:ff:ff:ff:ff:ff
     inet 10.166.58.16/24 brd 10.166.58.255 scope global dynamic eth1
        valid_lft 84973sec preferred_lft 84973sec
     inet6 fe80::f816:3eff:fe96:cd52/64 scope link
        valid_lft forever preferred_lft forever
 4: docker0:  mtu 1500 qdisc noqueue state DOWN group default
     link/ether 02:42:b8:9a:bd:62 brd ff:ff:ff:ff:ff:ff
     inet 172.17.0.1/16 brd 172.17.255.255 scope global docker0
        valid_lft forever preferred_lft forever
 [cloud-user@deploy-vm ~]$
You can see in above output we have 1500 MTU in eth0 and eth1 interface.
Now I am going to change it from 1500 MTU to 1600 MTU with ip command like below: –
[cloud-user@deploy-vm ~]$ sudo ip link set mtu 1600 eth0
[cloud-user@deploy-vm ~]$ sudo ip link set mtu 1600 eth1
[cloud-user@deploy-vm ~]$
6. How to verify MTU with IP command?
Now we can verify our MTU size is changed or not with ip a command like below: –
You can see in above output we have successfully changed MTU size with ip command.
7. How to verify the MTU packet size with ping command?
Now I am going to verify MTU packet size with ping commands.
[root@urcloud ~]# ping -M do -s 8980 10.167.30.3
PING 10.167.30.3 (10.167.30.3) 8980(9008) bytes of data.
ping: local error: Message too long, mtu=9000
ping: local error: Message too long, mtu=9000
ping: local error: Message too long, mtu=9000
^C
--- 10.167.30.3 ping statistics ---
3 packets transmitted, 0 received, +3 errors, 100% packet loss, time 1999ms
[root@urcloud ~]# ping -M do -s 8960 10.167.30.3
PING 10.167.30.3 (10.167.30.3) 8960(8988) bytes of data.
8968 bytes from 10.167.30.3: icmp_seq=1 ttl=64 time=0.259 ms
8968 bytes from 10.167.30.3: icmp_seq=2 ttl=64 time=0.269 ms
8968 bytes from 10.167.30.3: icmp_seq=3 ttl=64 time=0.209 ms
^C
--- 10.167.30.3 ping statistics ---
3 packets transmitted, 3 received, 0% packet loss, time 2000ms
rtt min/avg/max/mdev = 0.209/0.245/0.269/0.031 ms
[root@urcloud ~]#
Hey, I think your blog might be having browser compatibility issues. When I look at your website in Safari, it looks fine but when opening in Internet Explorer, it has some overlapping. I just wanted to give you a quick heads up! Other then that, excellent blog!
Hello my friend! I wish to say that this article is awesome, nice written and include almost all vital infos. I’d like to see more posts like this.
I got what you intend, thanks for putting up.Woh I am delighted to find this website through google.
Good write-up. I absolutely appreciate this site. Keep it
up!
I was curious if you ever considered changing the structure of your site? Its very well written; I love what youve got to say. But maybe you could a little more in the way of content so people could connect with it better. Youve got an awful lot of text for only having one or two pictures. Maybe you could space it out better?
certainly like your web site however you need to test the spelling on several
of your posts. Several of them are rife with spelling problems
and I to find it very troublesome to inform the truth
however I’ll surely come again again.
Thanks-a-mundo for the blog.Really thank you! Great.
These are in fact enormous ideas in about blogging.
You have touched some fastidious factors here. Any way keep up wrinting.
Please let me know if you’re looking for a writer for your weblog. You have some really great articles and I believe I would be a good asset. If you ever want to take some of the load off, I’d love to write some articles for your blog in exchange for a link back to mine. Please shoot me an email if interested. Thank you!
I happen to be writing to make you be aware of what a awesome encounter my friend’s daughter obtained browsing the blog. She figured out plenty of pieces, not to mention what it’s like to have a marvelous giving spirit to let men and women with no trouble know selected extremely tough topics. You undoubtedly exceeded visitors’ desires. Many thanks for showing the great, healthy, informative and as well as fun tips about this topic to Ethel.
Very nice post. I just stumbled upon your blog and
wished to say that I have really loved surfing around your
blog posts. After all I’ll be subscribing for your
feed and I hope you write again very soon!
Just desire to say your article is as amazing. The clarity in your post is simply nice and i can assume youre an expert on this subject. Well with your permission allow me to grab your RSS feed to keep updated with forthcoming post. Thanks a million and please continue the gratifying work.
A big thank you for your article.Really looking forward to read more.
I¦ve learn several just right stuff here. Certainly value bookmarking for revisiting. I surprise how a lot effort you set to make this type of fantastic informative web site.
An impressive share, I simply given this onto a colleague who was doing a little analysis on this. And he the truth is purchased me breakfast as a result of I discovered it for him.. smile. So let me reword that: Thnx for the deal with! But yeah Thnkx for spending the time to discuss this, I feel strongly about it and love studying extra on this topic. If possible, as you develop into experience, would you mind updating your weblog with more details? It is extremely helpful for me. Massive thumb up for this blog submit!
I really enjoy the article. Much thanks again. Really Great.
I am so grateful for your blog. Much thanks again. Really Great.
I really enjoy the blog. Really looking forward to read more. Keep writing.
Very good article post. Really looking forward to read more. Keep writing.